![]()
RC-USB V2.0 Interface
Use RC Transmitter for play RC Simulator Games or PC Windows games.
Support for general RC transmitter since 2 to 9 channel.
TWO System
Support both PPM and Servo signal.
PPM : 1-9 ch from DSC / Trainer Port
Servo: 1-4 ch from receiver RC Am,Fm,Fm-Hrs,Fm-Pcm
Each TX-channel can
define to function Axis (1-8) or Button (1-8) as you wish.
Easy to manage all TX-channel by "RC-USB TX Channel Manager"
software.
You can use your
RC Tramsmitter as Windows USB-Joystick
for play RC Simulator games ...Virtual RC, RealRace-G2, FMS, RIPMAX,
RealFlight-G2 (no interlink), RC Plane Master and more ...
and play PC game ... NFS UnderGround2, SCAR, LifeForSpeed, X-Plane
MS Flight Simulator, LOCKON, FALCON4, F/A-18 and
more...
> RC Simulator
& PC Games listing [ Click
Here ]
> RC-USB V2.0 Interface Kit detail [ Click
Here ]
> RCUSB DSC/Trainer Cable detail [ Click
Here ]
> Guide to calibrate USB Joystick [ Click
Here ]
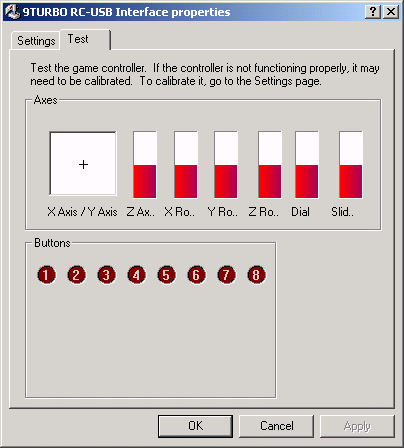
Windows XP/2000 will see RC-USB V2.0 Interface as
USB Joystick 8-Axis 8-Button
So,you can use it with general PC windows games that use joystick.
RC-USB TX Channel Manager Installation & USAGE
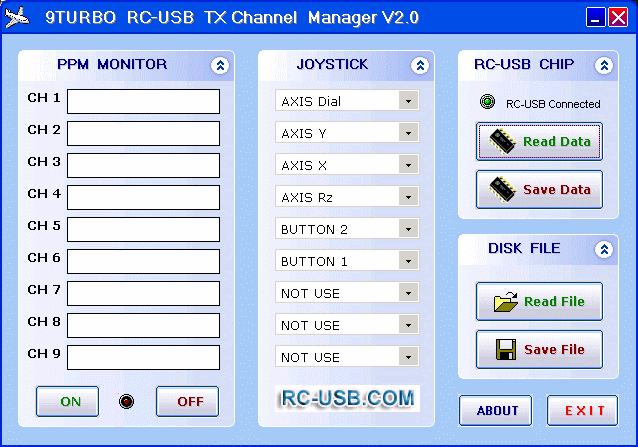
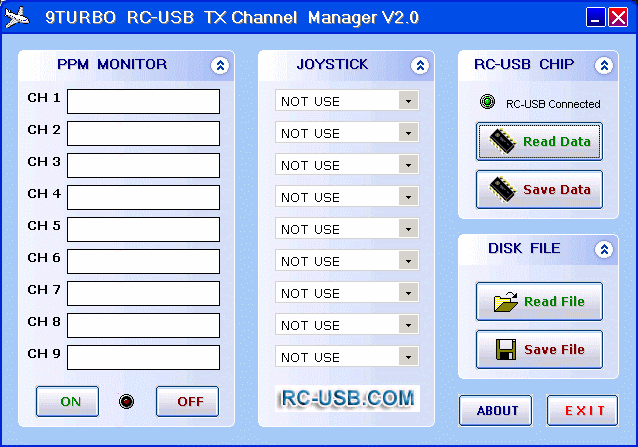
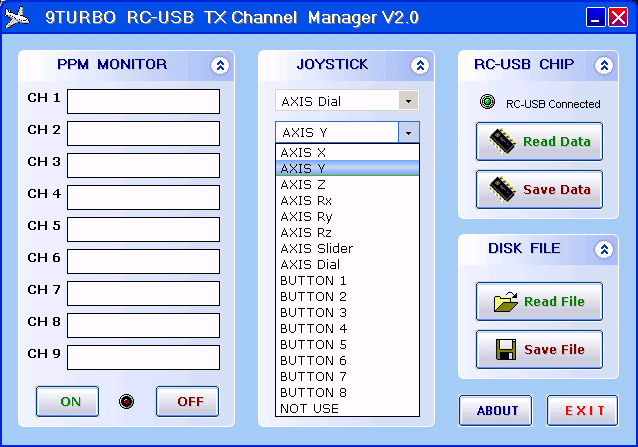
RC-USB TX Channel Manager
This software
will help you define your TX channel to Joystick-AXIS or Joystick-Button
as you wish.
Each TX channel can define to AXIS X,Y,Z,RX,RY,RZ,Dial,Slider or Button
1-8
Why we must use RC-USB TX Channel Manager?
1. Each Brand of RC Transmitter, Function of channels are differrent.
Expecially
channel 1 - 3 as show in this table.
| Transmitter | CH1 | CH2 | CH3 | CH4 | CH5 | CH6 |
|---|---|---|---|---|---|---|
| Futaba | Airelon | Elevator | Throttle | Rudder | Gear | Flap |
| JR | Throttle | Airelon | Elevator | Rudder | Gear | Flap |
| Airtronics | Elevator | Airelon | Throttle | Rudder | Gear | Flap |
| Walkera | Throttle | Elevator | Airelon | Rudder | Gear | Flap |
2. The games that use joystick. Some game use same Axis/Button. Some use
different. see the sample at this table.
| Simulator | Airelon | Elevator | Throttle | Rudder | Gear | Flap |
|---|---|---|---|---|---|---|
| RealFlight G2 | Axis X | Axis Y | Dial | Rz (Z Rotate) | Button1 | Button2 |
| RIPMAX | Axis X | Axis Y | Axis Z | Rz (Z Rotate) | Button1 | Button2 |
| FMS | Axis X | Axis Y | Axis Z | Rz (Z Rotate) | Rx (X Rotate) | Ry (Y Rotate) |
| RC Plane Master | Axis X | Axis Y | Axis Z | Rz (Z Rotate) | Rx (X Rotate) | Ry (Y Rotate) |
| AeroFly Pro Deluxe | Axis X | Axis Y | Dial | Rz (Z Rotate) | Rx (X Rotate) | Ry (Y Rotate) |
========================================================================
Install Software RC-USB TX Channel Manager
1. Insert CD "RC-USB V2.0" to CD drive.
2. Go to folder "RC-USB TX Channel Manager" then run file "setup.exe"
3. The installer will install software "RC-USB TX Channel Manager" to harddisk.
(Install to folder c:/Program Files/9TURBO/RC-USB)
Use program RC-USB TX Channel Manager
![]() After installation ready. you will see this icon at DeskTop windows.
After installation ready. you will see this icon at DeskTop windows.
Dubble click at this icon. The Program will open and run.
Or use windows menu: Start -> Programs -> 9TURBO -> RC-USB TX
Channel Manager
You should run this
program at first of use RC-USB V2.0 for define channel-function of RC-USB
V2.0 to match with your Transmitter.
Use for define your TX-channel to Joystick Axis/Button for match with
the game that you want to play.
And you should use this program. each time that you change Transmitter
or change the game that you want to play.
>>> Function of Button <<<
RC-USB CHIP Panel
[Read Data] Read Channel-Function data from RC-USB chip.
Use for read current Channel-Function data from the chip. The data will
show at JOYSTICK panel.
So, you can know that Each TX-Channel was defined to AXIS? or Button?
[Save Data] Write Channel-Function data to RC-USB chip.
Use for save Channel-Function that you define in JOYSTICK panel. write
it to RC-USB chip.
The Data that write to the chip already. it will permanent remain, until
you rewrite it.
DISK FILE Panel
[Read File] Read Channel-Function data from file harddisk.
Use for read file Channel-Function data from harddisk (file .RCU). The
data will show at JOYSTICK panel.
[Save File] Save Channel-Function data to file harddisk.
Use for save Channel-Function that you defined in JOYSTICK panel. write
it as file to harddisk. (File .RCU)
PPM MONITOR Panel
[ON] Display PPM signal of each TX-channel on PPM Monitor panel.
Each CH bar-graph
will movement follow by your Transmitter-Stick movement.
It useful for find your TX-Channel associated with your TX-Stick.
and you can see characteristic of each TX-channel.
Example if some TX-channel was mixed by transmitter MIX function. you
can see mixing work at PPM panel too.
or some TX-Channel was limit by tranmitter EPA function. you can see it
too.
(While PPM Monitor ON, you can not read/write data to chip RC-USB)
[OFF] Stop display PPM signal on PPM Monitor panel.
When you don't use PPM Monitor. you should off it. For return the process
to RC-USB chip.
Quit Program
[EXIT] Close and exit program.
Before you press [EXIT] , you must sure that you write your defimed channel-function
data to RC-USB chip already, by Press Button [Save Data].
and should save your defined channel-function data to file harddisk, by
press button [Save File]. for use it in the next time.
====================================================
Press button [Read Data] for read current define Channel-Function
data from RC-USB chip.
The data will
show at JOYSTICK panel. So, you can know that each TX-Channel was defined
to AXIS? or Button?
Press button
[ON] for see PPM signal characteristic of each TX-channel.
Try to movement your TX-stick for know associate of TX-stick and TX-channel.
Each CH bar-graph
will movement follow by your Transmitter-Stick movement.
you can see characteristic of each TX-channel.
Example if some TX-channel was mixed by transmitter MIX function. you
can see mix work at PPM panel too.
or some TX-Channel was limit by tranmitter EPA function. you can see it
too.
If your TX-channel PPM signal was MIXED by MIX function or limited by
EPA function.
you should set your tranmitter to UN-MIX channel, and EPA should equal
100% for the best solution for game simulator.
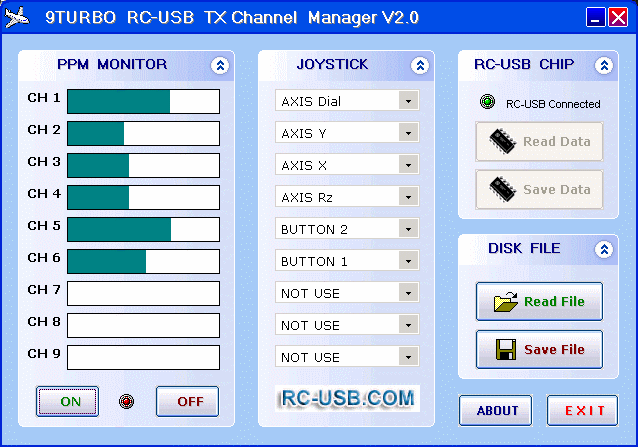
Now, you know associate of ecah TX-stick and TX-channel. then press button
[OFF] for stop PPM Monitor display.
You can define function of each TX-channel to AXIS? or BUTTON? by select
at JOYSTICK Panel.
you should define TX channel-function(Axis/Button) for match with your
transmitter and the game that you want to play.
After defined
function(Axis/Button) of all TX-channel in JOYSTICK panel already.
Press button [Save Data] to write your defined channel-Function
data to RC-USB chip.
Then you should save your defined channel-function data to file harddisk
too. by press button [Safe File]
The filename should indicate about a game-name and tranmitter-model too.
Example: Aerofly-Futaba-FF7
Then press button [EXIT] for close and exit this program.
====================================================
The easy way to define channel-function
If you
don't know about define function (Axis/Button) to TX-Channel for match
with your tranmitter and the game.
Run program "RC-USB TX Channel Manager".
Then press button [Read File]. you will see many files (.RCU).
These files contain the defined channel-function data for match game and
transmitter.
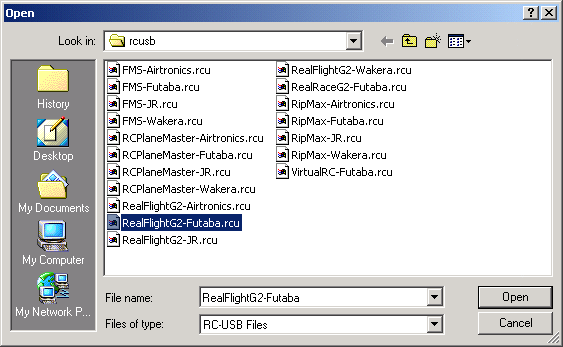
You can instance
use these file. after you chose a file which you want already. (click
at file which you want then press button [Open] )
The Program will read data from a file. and display defined channel-function
data in JOYSTICK Panel.
Press button [Safe Data] for write new define channel-function
data to the RC-USB chip.
Press button [EXIT] for close and exit this program.
Now, RC-USB V2.0 is prompt to use.
Each time that you
re-define channel-function. you should re-calibrate windows-joystick too.
For accurate of position control. The way to calibatre windows-joystick
is here -> [Calibrate].
============================================================================
Short Note:
Comment: After you defined channel-function
already.
1. Press [Save Data] button, for write new define data to RC-USB
chip.
2. Press [Save File] button, If you want to write data to your
Disk too.
3. Press [EXIT] button, for CLOSE this program, it will let RC-USB
Chip to working as Windows-JOYSTICK.
4. Calibrate your new defined Joystick: Press Start -> Settings ->
Control Panel -> Gaming Options [ Click
Here for Detail ]
Mr.Smith Vorapatratorn
9TURBO MODIFY [ http://9turbo.com ]
Chiangrai, THAILAND